The Power to Control
This 4 lesson mini-unit plan, which combines the key learning areas of Technologies and Science, is provided to assist in teaching students understanding of how electrical energy is used to control light, sound or movement. Learning through each of the 60 minute lessons within this mini-unit can be completed by students individually, in pairs, or in small peer groups, at the discretion of the class teacher. The 4th lesson is the assessment for the unit. Content within the lessons and assessment addresses the following Australian Curriculum content descriptors:
Technologies - Year 5/6
Design and Technologies - Knowledge and Understanding: Investigate how electrical energy can control movement, sound or light in a designed product or system (ACTDEK020).
Design and Technologies - Processes and Production: Generate, develop and communicate design ideas and processes for audiences using appropriate technical terms and graphical representation techniques (ACTDEP025).
Science - Year 6
Science Understanding: Electrical energy can be transferred and transformed in electrical circuits and can be generated from a range of sources (ACSSU097).
Lesson 1: Introduction to Electricity
1. Look at electrical devices/object that create light, sound or movement: for example a torch, radio, battery fan, toy.
2. Discuss with students what they think makes these electrical objects work - why do they stop or start? Use strategies such as 'think, pair, share'.
3. Play YouTube video 'Introduction to Electricity' (5:16) [link below]. Video explains what electricity is (moving electrons), what batteries are, and introduces and explains words and terms which will be used during this unit: conductors, charge, current, amperes/amps, voltage/volts, circuits and short circuits. It explains the voltage of batteries, and the danger of high voltage.
NOTE: In the video the narrator uses the terms minus and plus to explain positive and negative. After watching, make sure students know the correct terminology - negative and positive.
NOTE: In the video the narrator uses the terms minus and plus to explain positive and negative. After watching, make sure students know the correct terminology - negative and positive.
4. Look at electrical circuits - what are they? Ask students what they think an electrical circuit is. Allow them to discuss using 'think, pair, share' or small group strategy.
5. Watch explanation video 'Explaining an Electrical Circuit' (2:27), stopping the video at 1:30 [link below].
5. Watch explanation video 'Explaining an Electrical Circuit' (2:27), stopping the video at 1:30 [link below].
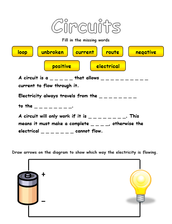
6. Instruct and assist students to complete 'Circuits' worksheet [link to worksheet and answers below], where they must choose the correct word to fill in the spaces, then draw arrows to show the direction of electrical current on a diagram (from negative to positive).
CIRCUITS WORKSHEET
CIRCUITS WORKSHEET ANSWERS
7. Go through and mark completed worksheet with students, making sure all students have changed any incorrect answers to the correct answers in their places. Collect worksheets, or have students glue them into Science or Technology workbook and collect for formative assessment.
8. Revise main ideas from today's lesson: current, negative, positive, complete circuit, closed circuit, short circuit.
Lesson 2: Simple Circuits
1. Revise previous lesson. Use pairing strategy to discuss terms/words learnt in previous lesson: circuit, current, negative, positive, energy etc.
2. Discuss what a circuit is, recalling worksheet from previous lesson (a circuit is a route/path/loop which electrical current/energy can pass through).
3. Show students YouTube video 'Simple Circuit: a fun, at-home science experiment' (2:06). In this video, the presenter disassembles a torch/flashlight and shows how a simple circuit is made using the batteries, bulb and a piece of wire.
4. Explain to students that circuits must be complete (closed) for electrical current to flow. If there is a gap in the circuit, such as when a switch is open/off, it is called an open circuit. When the circuit is open, electricity/current cannot continue along the circuit. Current can only continue around the complete circuit when the circuit is closed. Switches open or close a circuit.
5. Show image of electrical circuit symbols (below) on whiteboard. Instruct students to copy table into their Science or Technology workbook, ensuring that all diagrams are drawn as on provided image, as these are the symbols they will be using throughout this unit. Explain to students that the terms cells and batteries can be interchanged when circuits are very basic, such as during these lessons.
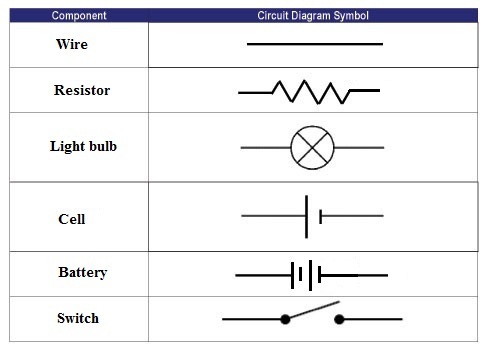
Electrical Circuit Symbols
6. Write the heading 'Circuits' on the whiteboard, and draw a basic open circuit diagram on the whiteboard for students to copy into their Science or Technology workbook. Instruct students to label all components, and place the label 'Open Circuit' under their diagram. An example diagram is given below, showing the battery/batteries (cells), wire, bulb and switch, which is open (off).
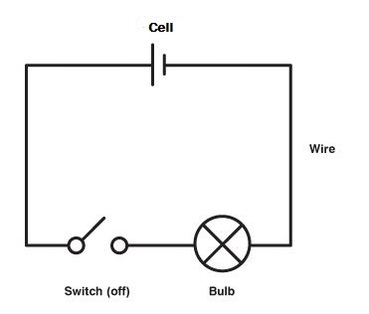
Open Circuit
7. Change circuit diagram to show switch closed (on), as pictured below, instructing students to draw this circuit in their workbooks (not just change their drawing, but draw entire circuit diagram again). Remind students to again label all components of the circuit, and label 'Closed Circuit' under their diagram.
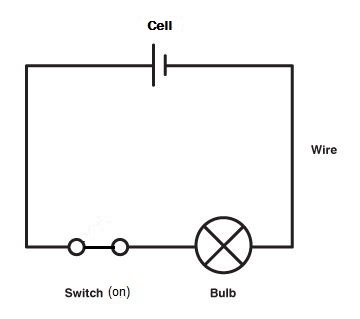
Closed Circuit
8. Disassemble a torch with students, allowing them to see the different components of the torch, and how the circuit is made within the torch. Instruct students to look at the switch of the torch whilst disassembled, to see if they can see the circuit open/close when flicking switch on and off. If possible, allow students to do this themselves, by having a number of torches and providing one torch per group.
9. Revise the difference between open and closed circuits, asking students to discuss in pairs/small groups before checking answers. Collect workbooks for formative assessment.
9. Revise the difference between open and closed circuits, asking students to discuss in pairs/small groups before checking answers. Collect workbooks for formative assessment.
Lesson 3: Creating Electrical Circuits
1. Revise previous lesson, the difference between open and closed circuits, and whether a switch is on or off for a closed circuit, and vice versa. Students can use 'think, pair, share' strategy to discuss answer before sharing with teacher/class.
2. Show students
3. Show students YouTube video 'Simple Circuits Video.wmv' (3:25), which shows the function of a switch, as well as introducing different types of circuits, such as in series (same current, split voltage) and parallel (split current, same voltage) circuits [link below].
2. Show students
3. Show students YouTube video 'Simple Circuits Video.wmv' (3:25), which shows the function of a switch, as well as introducing different types of circuits, such as in series (same current, split voltage) and parallel (split current, same voltage) circuits [link below].
4. Show students diagram of series and parallel circuits (below), asking them to identify which circuit diagram shows the in series, and which shows the parallel circuit. Explain how the light bulbs are shown using different symbols (some use a cross inside a circle, and others a curved line inside a circle). Instruct students to draw the diagrams of series and parallel circuits, being sure to label all components and diagram with the correct type of circuit.
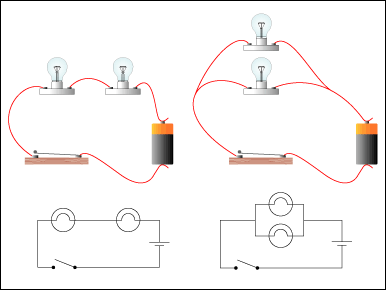
Circuits - in series and parallel
5. Students will experiment with open circuits, by creating a basic electrical circuit using batteries, bulbs and a range of materials, such as wires, metal and plastic coated paperclips, string etc. They must experiment and discover which of the materials can be used to most successfully close the circuit (as a closed switch does), to allow the electric current to complete the circuit. Students will write the experiment into their workbooks, complete with labelled diagrams showing their circuit, materials and components used. Instruct students when drawing circuit diagrams, to use the electrical circuit symbols in the table they drew into their workbooks during the previous lesson, and write an explanation of which materials were successful for completing a closed circuit.
6. Revise content from this lesson, checking for full understanding of all concepts covered, such as open and closed circuits, and which of the materials experimented with were successful in allowing electric current to complete a circuit. Make students aware that they will create their own working circuits during the assessment in the next lesson, which will need to be designed, drawn into a circuit diagram and created using a range of basic electrical components. Collect workbooks to check for understanding and complete formative assessment.
Lesson 4: Assessment
1. Students will complete the assessment for this unit of work, in which they must:
- design a system which uses electrical energy to control light, and
- communicate their designed electrical system using appropriate technical terms and graphical representation, in the form of a circuit diagram and written explanation.
